Habituellement j’ai peu de difficulté à tricoter à partir des laines que j’ai déjà (plutôt que de justifier un nouvel achat)… sauf lorsque j’ai besoin d’une couleur précise. C’est bien beau doubler un brin de laine pour obtenir un fil plus épais, mais c’est évidemment tout autre chose lorsqu’on veut une couleur ou une texture qu’on n’a pas. Lorsque ma sœur a demandé des accessoires d’hiver de couleur gris-pâle, j’ai pu trouver quelques pelotes d’une laine grise, la Rowanspun Tweed DK, mais je trouve celle-ci trop mince, trop fragile et trop… tweedy. Je voulais quelque chose de plus lisse, plus pâle et plus épais… Alors j’ai combiné la Malabrigo Sock qu’il me restait après avoir terminé Fileuse avec le Rowanspun Tweed et le résultat est précisément le juste milieu dont je cherchais. Une laine plus douce, plus résistante, et joliment marbrée.
I generally find it pretty easy to knit from stash, even for gift knitting, except when I need a specific colour. It’s all well and good to hold yarn double-stranded to get a larger gauge, but what to do if you need a lighter shade? A smoother texture? My sister will be visiting from a very balmy Sydney, Australia for the first time in too long next month and for Christmas she’s requested some winter accessories in a pale grey. I had some left over Rowanspun DK but it was a bit too thin, too fragile, too dark and a bit too tweedy for my liking. So I paired it with some smooth Malabrigo sock in Natural left over from Fileuse and the result of holding the two yarns together gave me exactly the colour and texture I was looking for : a worsted, marbled pale grey with just a touch of tweed.

Le modèle est le Shameless Mitts de Stacey Duke Simpson, légèrement modifié pour en faire des mitaines. J’ai gardé le motif câblé mais j’ai monté les mailles commençant au poignet, crée une courroie pour le pouce après environ 10 cm et effectué des diminutions de manière la plus symétrique que possible une fois que la mitaine dépassait mon petit doigt. Je les aime beaucoup, mais je serais intéressée à maîtriser la technique de tricoter deux mitaines ( ou deux chaussettes) en même temps. Ça éviterait non seulement l’ennui d’avoir à tricoter le même modèle deux fois mais aussi l’erreur que j’ai commise en tricotant la deuxième mitaine avec des aiguilles plus petites que la première! Heureusement après un bon blocage et quelques douzaines d’épingles elles sont de la même grandeur!
The pattern is Stacey Simpson Duke's Shameless Mitts, which I’ve mittenized for the Canadian winter (Lil Sis will only be visiting for a couple of weeks, but at least she’ll be warm!). I kept the diamond cable motif but cast on at the wrist instead of the fingers. I created a thumb gusset in seed stitch, which I increased every 2nd round until it was 19 sts wide before working it on its own in the round. I kept the body of the mitten going until it reached the tip of my little finger, then decreased as symmetrically possible to create a rounded mitten top. I love them as much as the Shameless Slouch and highly recommend the pattern, fingerless or not. The only thing I’d do differently is to start the thumb gusset a bit further away from the diamond cable (I just eyeballed it this time), and learn to knit two mitts at the same time on one or two circular needles, mostly because I accidentally knit the second mitt on smaller needles than the first and it took a few dozen blocking pins to get them to be the same size!

Shameless Mitts
Tuesday, November 18, 2014

Alors, Dernier coup de cœur pour le design avant le temps des fêtes... d 'ici là ce ne sera que des cadeaux tricotés à partir de jolis modèles que j'admire chez les autres. Je viens tout juste de terminer une tuque dans le même style que le chandail Spinster et le Spinster Cowl, que je dois bien evidemment nommer le Spinster Slouch. Quoique ma tuque n'est pas très slouch en fin de compte, mais plustôt un hybride entre le beanie et le slouch, faute de ne pas avoir bloqué très agressivement. Je songe à lui donner un blocage sur un bol ou un ballon pour avoir un peu plus de slouch, mais pour l'instant je l'aime bien comme ça! La laine est la Silk Yak 4-ply de Sericin Silkworks, une laine extraordinairement douce et plutôt reluisante, ce qui met en valeur la texture des côtes et des câbles.
I think this will be my last new design until the holidays, and definitely the last Spinster-themed one, promise. So in the same vein as the Spinster sweater and Spinster Cowl, I just cast off this hat, which obviously must be named the Spinster Slouch. Although should point out that the hat seems to be more of a hybrid between a beanie and a slouch right now, I could have blocked it more aggressively. I just draped it over an oval coffee canister and steamed it, but could have wet-blocked it instead and draped it over a bowl or a balloon, I suppose. I might eventually to this but I like the fit right now. The yarn is absolutely luxurious, soft as a cloud and so lustrous - perfect to show stitch definition and cabling It's Silk Yak 4-ply from Sericin Silkworks.
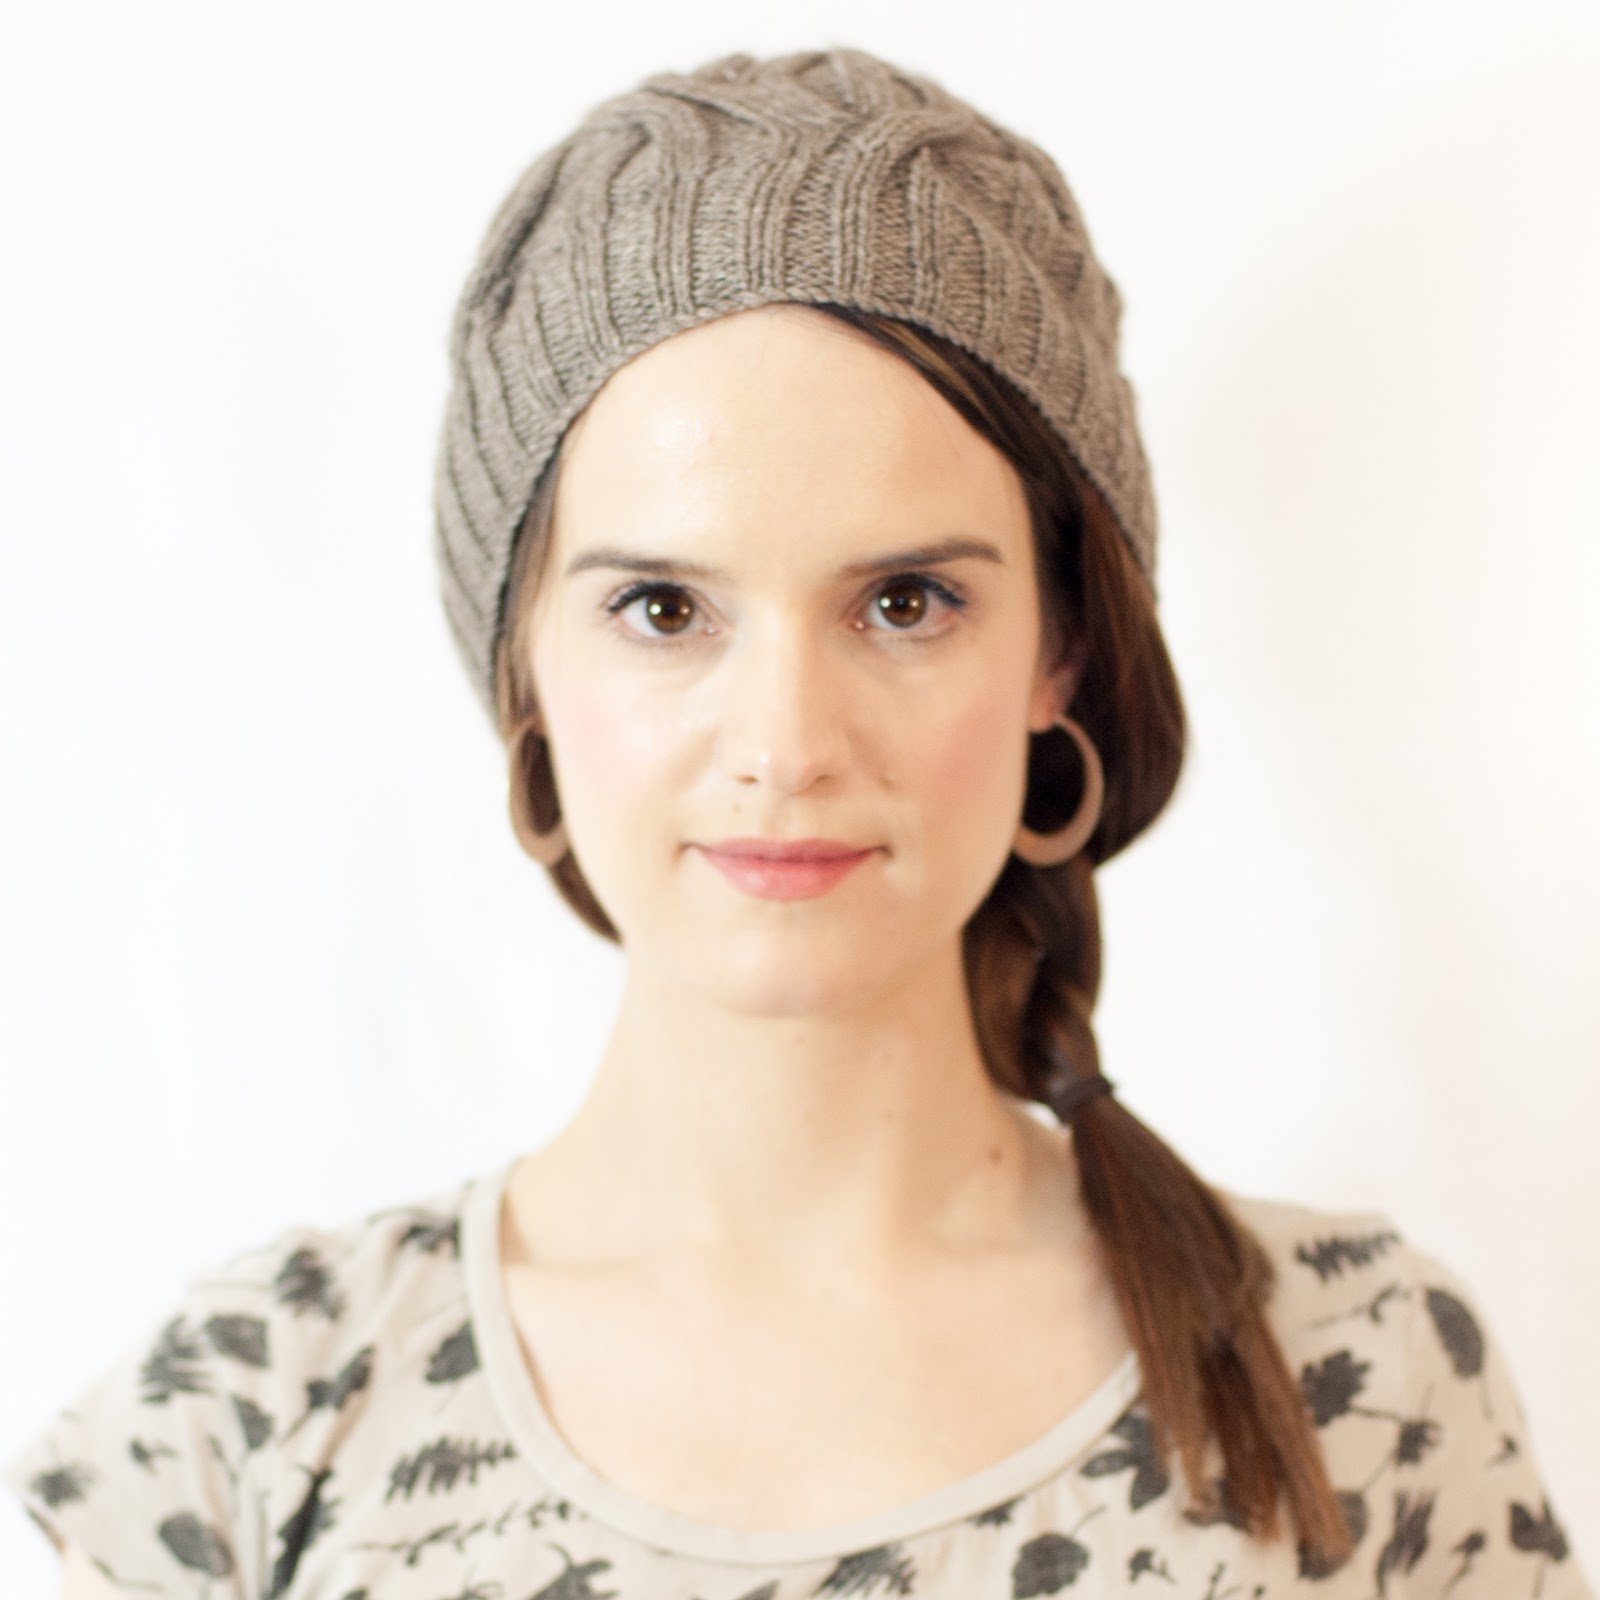
Tricoté tel qu'écrit (en anglais seulement, désolée!), le slouch prend environ un écheveau et le le quart d'un deuxième. Il me reste juste assez pour tricoter un bandeau pour les occasions ou je porte une queue de cheval ou un chignon au travail.
Knit as written, the hat requires approximately 1 and ¼ skein of Silk Yak 4-ply, leaving just enough yarn left over from the second skein to knit a headband for the days when I wear my hair up for work (I SHOULD say for outdoor winter runs, but I'm leaving that one on the New Year resolutions block for now!)

Yarn: 1.25 skeins of Sericin Silkworks Silk Yak 4-ply, or 181 meters (207 yards) of yarn needed to achieve gauge. http://www.ravelry.com/yarns/library/sericin-silkworks-silk-yak-4-ply
Gauge: 24.5 sts and 30 rows in stockinette stitch using US 6 (4mm) needles.
Needles:
- US 3 (2.75mm or 3.25mm) needles for the brim. The brim will stretch over time, something to keep in mind if using a yarn with lots of drape such as this one. I might consider carrying a strand of elastic with my knitting for the first few rounds next time.
- US 6 (4mm) needles for the body. I used 32” circulars to work magic loop, 16” circulars or DPNs will of course do just as well. You will also need a cable needle.
Abbreviations:
Sl1, k2tog, psso : slip 1 stitch knit-wise, knit 2 together, pass slipped stitch over the k2tog.
sl1, p2tog, psso : slip 1 stitch purl-wise, purl 2 together, pass slipped stitch over the p2tog.
Pattern:
Cast on 120 stitches with US 3 needles, place marker and join to work in the round. Work in 2x2 rib for 1.5 inches.
Switch to US 6 needles and continue in 2x2 rib for 1 more round.
Next round : *(k1, k1fb, p1, p1fb), repeat from * to end end of round. 180 sts.
Next round : Work in 3x3 rib for 4 rounds.
Next round : Knit cable chart twice. (rows 1-24, twice). If you want more slouch, begin knitting cable chart a third time, ending on row 8 (the sample I am wearing in these photos does NOT have this extra cable repeat. I only knit the cable chart twice.)
Important note about the cable pattern: After your first cable crossing on Row 7, you'll notice that some places, the stitches around the cables that were originally 3x3 ribbing will be no longer be “k3, p3”, but rather k6 and p6. Not to worry, just make sure you always knit the knits and purl the purls. After your second cable crossing in row 19 the chart, the “k3, p3” order will be restored. Also, stitches will be tight on the needle after the cabling rows. Work slowly and loosely to avoid hand cramps (at least I had to!)
Next round : knit 6 more rounds keeping in 3x3 rib (k3, p3).
Next round (decrease round). *(k1, k2tog, p1, p2tog). Repeat from * to end of round.
Next rounds : Knit 2 rounds in 2x2 rib (k2, p2).
Next round (decrease round) : *(k2tog, p2tog). Repeat from * to end of round.
Next rounds : work in 1x1 rib (k1,p1) for 2 rounds.
Next round (decrease round) : *(Sl1, k2tog, psso) (sl1, p2tog, psso). Repeat from * to end of round.
Next rounds : work in 1x1 rib (k1,p1) for 2 rounds.
Next round (decrease round) : *(Sl1, k2tog, psso) (sl1, p2tog, psso). Repeat from * to end of round.
Break yarn, draw through remaining stitches and pull closed. Weave in ends.
Block the body of hat to bring out the cables, but be very careful not to stretch the brim.
As for my other free patterns, if you enjoyed knitting this hat and it keeps you warm, please consider helping the less fortunate to be a bit more comfortable as well by donating funds, time, clothing, or non-perishable items to your local homeless shelter or food bank. Thank you!


Spinster Slouch
Wednesday, November 12, 2014
Le chef d’œuvre que j’aimerais partager aujourd’hui ne peut pas m’être attribué, mais je suis assez chanceuse qu’il m’appartient! C'est aussi une petite anecdote plutôt personnelle. J’ai reçu en cadeau ces gants magnifiques tricotés par ma chère amie Cheryl :
The project I'd like to share today wasn't knit by me, but I'm lucky enough to call these gloves mine! I received these gorgeous fingerless mitts from my dear friend Cheryl and took out the camera the moment I got home:

Je sais que les nouvelles amies de cœur à l’âge adulte se font rares, et qu'une amie de cœur qui partage les mêmes passions est vraiment extraordinaire. Je me souviendrai toujours du moment exact qu’on s’est rencontrées car j’étais instantanément convaincue d’avoir trouvé une âme sœur. Étant introvertie au max, je serai éternellement reconnaissante qu’elle a eu le cran de s’introduire lorsqu’on faisait la queue dans la file d’attente à Rhinebeck en 2012! Depuis ont est devenues de véritables amies, partageant les larmes et les fou rires et je me compte tellement chanceuse.
I'd always assumed that making new (IRL) friends as an adult would be difficult, and friends who shared the same taste and hobbies would be, well, nearly impossible. Which is why, as an uber-introvert, I'll be forever grateful for the moment Cheryl introduced herself to me while we were waiting in line to enter Rhinebeck in 2012 and helped me realize that not only did we already sort of know each other from some Ravelry threads, but we were TOTALLY KINDRED SPIRITS. I write this in all caps because there's really no other way to put it :p The giddiness and enthusiasm I feel when I spend time with her is unstoppable! We've shared both sad and joyous moments in the years since and she's introduced me to amazing ladies (Maggie! Grace! Sharon! Linda!) who have also put up with me being the newb in the bunch.

Le modèle se nomme Latvian Fingerless Mitts, une création de Beth Brown-Reinsel. Cheryl a utilisé la laine Brown Sheep Nature Spun Sport. Son projet peut être accédé en cliquant ici. J'ai essayé ces gants pour la première fois lors d'une visite chez elle et jamais je n'aurai envisagé avoir la chance de les porter tous les jours ( alors bien sûr que je les porte pour mon trajet quotidien au bureau!)
The pattern is Beth Brown-Reinsel's Latvian Fingerless Mitts, a beautiful exercise in colourwork. Cheryl used Brown Sheep Nature Spun Sport and her Ravelry project page is here. I fell in love with these during visit and wouldn't have dreamed to get to wear them to work every day (which, of course, I do :)


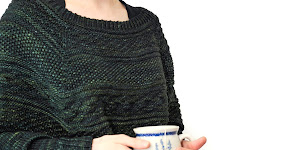
Un bref aperçu des cols terminés sur mon profil Ravelry et ça saute aux yeux : j'aime la couleur. Non, j'adore la couleur! Cela dit, il m'arrive parfois de rêver à un col un peu plus monochrome lorsque j'enfile mon manteau noir, ces jours ou les couleurs vives ne me disent rien ( heureusement que ça ne m'arrive pas souvent!). Alors j'ai piqué le tableau des côtes et câbles du chandail Spinster, doublée ma laine pour obtenir un fil Aran, monté 200 mailles... et déclaré le tout terminé trois répétitions plus tard.
A quick glance at the finished cowls on my Ravelry Project page and it's pretty clear : I like colour. A lot. But once in a while when I'm wearing matching black coat, boots and purse, I wish that I had something a bit more colour-neutral to throw on around my neck. It doesn't happen often though!
So I dug up the rib and cable pattern from the Spinster sweater, picked the only gray yarn I have at the moment, held it double stranded, and cast on in the round. Three chart repeats later I cast off and called it a cowl. I'm pleased that the ribbing keeps things stretchy (and reversible, should that matter), so it's easy to pull over my head without messing up my hair. Goodness know my baby-fine hair loves every opportunity to generate static this time of year....

Spinster Cowl
Yarn and needles : Aran weight or whichever yarn achieves gauge. I used Rowanspun DK (which feels more like fingering weight to me), held double, with US8 (5mm) circular needles with 24 inch cable.
Gauge : 18 sts / 4 inches in stockinette stitch
Yardage : The finished cowl weighs 159 grams. I held two strands together, so I used roughly 636 meters. If you use a worsted or aran weight yarn to get gauge, knit singled-stranded that would be approximately 318 meters. Thanks to Tabi for pointing this out!
Important detail about the cable pattern: After your first cable crossing, the 2 x 2 ribbing will be no longer be “k2, p2”, in some places, but rather k4 and p4. Not to worry, just make sure you always knit the knits and purl the purls… after your second cable crossing in the chart, the “k2, p2” order will be restored.
Instructions : Cast on 200 stitches and join in the round being careful not to twist. Work rows 1-22 of chart 3 times. Cast off loosely, using a larger needle if necessary. Block.

Spinster Cowl
Sunday, November 2, 2014
Subscribe to:
Posts (Atom)

.jpg)